- Prep Time: 30 minutes
- Resting & Rising Time: 8–12 hours
- Cook Time: 40 minutes
- Total Time: Approximately 10–13 hours
- Difficulty Level: Intermediate
- Servings: 12 slices
- Cuisine: American
- Calories: Approximately 170 calories per slice
Ingredients
For the Dough
- 500 grams bread flour
- 100 grams active sourdough starter
- 300 grams warm water
- 40 grams unsalted butter, softened
- 25 grams honey or sugar
- 10 grams salt
Optional Add-Ins
- 2 tablespoons milk powder for extra softness
- 1 tablespoon olive oil for richer flavor
- Rolled oats for topping
Equipment Needed
- Large mixing bowl
- Kitchen scale
- Dough scraper
- 9×5-inch loaf pan
- Clean kitchen towel
- Cooling rack
How to Make Sourdough Sandwich Bread
Step 1: Feed the Starter
Start by feeding your sourdough starter about 4–6 hours before making the dough. Your starter should be bubbly, active, and doubled in size before using.
A healthy starter is the key to achieving a beautifully risen loaf.
Step 2: Mix the Dough
In a large bowl, combine:
- Active sourdough starter
- Warm water
- Honey or sugar
Stir until mostly dissolved.
Add the bread flour and mix until a shaggy dough forms. Let the dough rest for 30 minutes. This resting period is called the autolyse stage and helps improve gluten development.
After resting, add the salt and softened butter. Knead until the dough becomes smooth and elastic. This usually takes about 8–10 minutes by hand or 5 minutes with a stand mixer.
Step 3: Bulk Fermentation
Place the dough in a lightly greased bowl and cover with a damp towel.
Let it rise at room temperature for 4–6 hours. During the first 2 hours, perform a stretch and fold every 30 minutes.
To do this:
- Grab one side of the dough
- Stretch it upward
- Fold it over the center
- Rotate the bowl and repeat
This strengthens the dough without intensive kneading.
The dough should become smoother, puffier, and slightly airy by the end of fermentation.
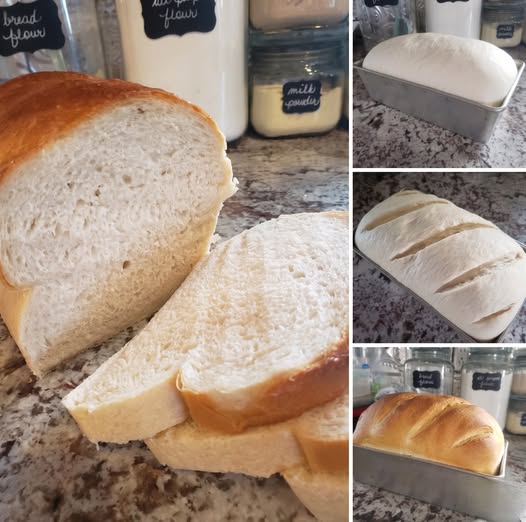
Step 4: Shape the Dough
Turn the dough onto a lightly floured surface.
Gently flatten it into a rectangle, then roll it tightly into a log shape. Pinch the seam closed.
Place the dough seam-side down into a greased loaf pan.
Step 5: Final Proof
Cover the loaf pan loosely with plastic wrap or a towel.
Let the dough rise until it crowns about 1 inch above the rim of the pan. Depending on room temperature, this can take 2–4 hours.
For deeper sourdough flavor, you can refrigerate the loaf overnight during this stage and bake the next morning.
Step 6: Bake the Bread
Preheat your oven to 375°F (190°C).
Bake the bread for 35–40 minutes until the top is golden brown and the loaf sounds hollow when tapped.
If the top browns too quickly, loosely tent it with foil during the last 10 minutes of baking.
The internal temperature should reach about 200°F (93°C).
Step 7: Cool Before Slicing
Remove the bread from the pan immediately after baking and place it on a cooling rack.
Allow it to cool for at least 1 hour before slicing. Cutting too early can make the bread gummy inside.
Once cooled, slice evenly with a serrated bread knife.
Tips for Perfect Sourdough Sandwich Bread
Use an Active Starter
A sluggish starter can result in dense bread. Always ensure your starter is bubbly and active before mixing dough.
Measure Ingredients by Weight
Using a kitchen scale provides accurate measurements and more reliable results than cups.
Don’t Rush Fermentation
Sourdough relies on natural fermentation, which takes time. Warmer kitchens rise faster, while cooler temperatures slow the process.
Avoid Too Much Flour
Sticky dough is normal. Adding excess flour can create a dry loaf.
Store Properly
Keep the bread in an airtight container or bread bag at room temperature for up to 4 days.
Flavor Variations
This sourdough sandwich bread is easy to customize.
Honey Wheat Version
Replace 100 grams of bread flour with whole wheat flour and add extra honey.
Seeded Sandwich Bread
Add sunflower seeds, flaxseeds, or sesame seeds to the dough.
Cinnamon Raisin Bread
Mix in raisins and cinnamon sugar for a breakfast-friendly loaf.
Herb and Garlic Bread
Add dried herbs and roasted garlic for savory sandwiches.
Serving Suggestions
This bread works beautifully for:
- Grilled cheese sandwiches
- French toast
- Avocado toast
- Peanut butter and jelly
- Turkey sandwiches
- Garlic toast
- Breakfast toast with jam
The soft texture makes it especially kid-friendly.
Storage Instructions
Room Temperature
Store in a sealed bag or airtight container for 3–4 days.
Refrigerator
Not recommended, as refrigeration can dry out bread quickly.
Freezer
Slice the loaf and freeze in a freezer-safe bag for up to 3 months. Toast slices directly from frozen.
Common Problems and Solutions
Dense Bread
Possible causes:
- Weak starter
- Under-proofing
- Too much flour
Flat Loaf
Possible causes:
- Over-proofing
- Weak gluten structure
Gummy Interior
Possible causes:
- Slicing too soon
- Underbaking
Nutrition Information
Per Slice (Approximate)
- Calories: 170
- Protein: 5g
- Carbohydrates: 31g
- Fat: 3g
- Saturated Fat: 1.5g
- Fiber: 1g
- Sugar: 2g
- Sodium: 210mg
Sourdough Sandwich Bread
12
servings30
minutes40
minutes170
kcalIngredients
500 grams bread flour
100 grams active sourdough starter
300 grams warm water
40 grams unsalted butter, softened
25 grams honey or sugar
10 grams salt
Directions
- Feed the Starter
Start by feeding your sourdough starter about 4–6 hours before making the dough. Your starter should be bubbly, active, and doubled in size before using.
A healthy starter is the key to achieving a beautifully risen loaf. - Mix the Dough
In a large bowl, combine:
Active sourdough starter
Warm water
Honey or sugar
Stir until mostly dissolved.
Add the bread flour and mix until a shaggy dough forms. Let the dough rest for 30 minutes. This resting period is called the autolyse stage and helps improve gluten development.
After resting, add the salt and softened butter. Knead until the dough becomes smooth and elastic. This usually takes about 8–10 minutes by hand or 5 minutes with a stand mixer. - Bulk Fermentation
Place the dough in a lightly greased bowl and cover with a damp towel.
Let it rise at room temperature for 4–6 hours. During the first 2 hours, perform a stretch and fold every 30 minutes.
To do this:
Grab one side of the dough
Stretch it upward
Fold it over the center
Rotate the bowl and repeat
This strengthens the dough without intensive kneading.
The dough should become smoother, puffier, and slightly airy by the end of fermentation. - Shape the Dough
Turn the dough onto a lightly floured surface.
Gently flatten it into a rectangle, then roll it tightly into a log shape. Pinch the seam closed.
Place the dough seam-side down into a greased loaf pan. - Final Proof
Cover the loaf pan loosely with plastic wrap or a towel.
Let the dough rise until it crowns about 1 inch above the rim of the pan. Depending on room temperature, this can take 2–4 hours.
For deeper sourdough flavor, you can refrigerate the loaf overnight during this stage and bake the next morning. - Bake the Bread
Preheat your oven to 375°F (190°C).
Bake the bread for 35–40 minutes until the top is golden brown and the loaf sounds hollow when tapped.
If the top browns too quickly, loosely tent it with foil during the last 10 minutes of baking.
The internal temperature should reach about 200°F (93°C). - Cool Before Slicing
Remove the bread from the pan immediately after baking and place it on a cooling rack.
Allow it to cool for at least 1 hour before slicing. Cutting too early can make the bread gummy inside.
Once cooled, slice evenly with a serrated bread knife.